So you’re tuning a slow query and you create a new index to eliminate a table or clustered index scan. In your testing you find that it works well for some search arguments, but is ignored by the Optimizer for others. You notice that the “ignored” queries tend to return larger record sets. What’s going on here and how do you persuade the Optimizer to use your index (spoiler alert: you don’t!).
Odds are good that you’ve created a non-covering index. This is simply an index that doesn’t have all of the columns necessary to execute a query. Quick quiz…
Which (if any) of the queries below are covered by this index?
CREATE INDEX ix_LastName_FirstName__MiddleName
 ON Person.Person (LastName, FirstName) INCLUDE (MiddleName);
- SELECT Title, FirstName, LastName FROM Person.Person WHERE LastName = N’Martinez’;
- SELECT * FROM Person.Person WHERE LastName LIKE N’M%’;
- SELECT FirstName, LastName FROM Person.Person WHERE LastName = N’Martinez’;
- SELECT FirstName, LastName FROM Person.Person WHERE FirstName = N’Daniel’;
The answer is both C and D. In each case, the index contains all the data necessary to execute the query. You can see that in the respective query plans:
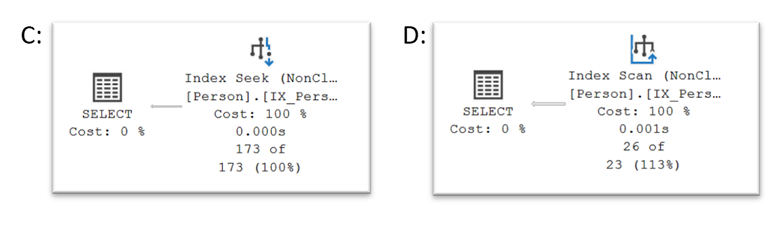
Note: Even though we need to scan the nonclustered index to find the Daniels, it’s still a net win over the cost of having to scan the clustered index (107 vs 3821 logical I/Os).
In the absence of a covering index (queries A and B), the Optimizer must choose between index seeks plus key lookups or a clustered index scan as illustrated below:
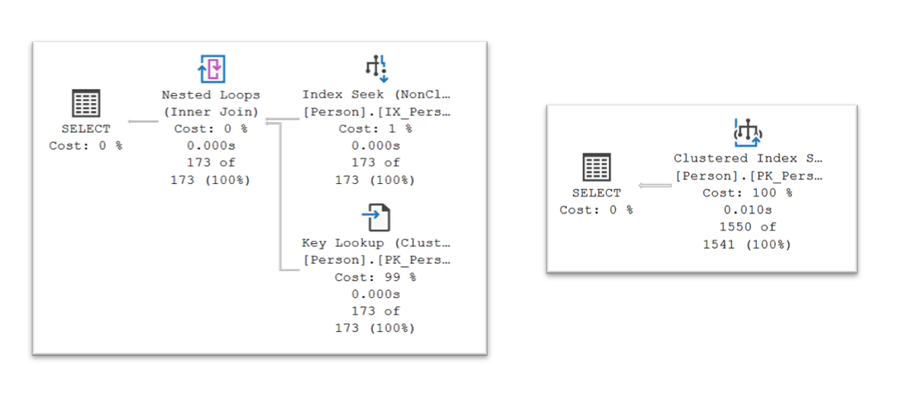
And its decision is driven primarily by I/O cost which in turn depends on row counts and index structure.
B-tree indexes (for both clustered and nonclustered indexes) are built of 8K pages arranged in levels. Each level is an index for the layer immediately below it, and there’s always a single page at the top (or root). You can find out how deep and wide your indexes are using the sys.dm_db_index_physical_stats() function:
SELECT i.name, s.index_type_desc, s.alloc_unit_type_desc, s.index_depth,
   s.index_level, s.page_count
FROM sys.indexes i
    CROSS APPLY sys.dm_db_index_physical_stats ( DB_ID (), i.object_id, i.index_id, NULL, 'DETAILED' ) s
WHERE i.object_id = OBJECT_ID ( 'Person.Person' ) AND
 i.index_id IN ( 1, 2 ) AND
s.alloc_unit_type_desc = N'IN_ROW_DATA';
Be careful using DETAILED mode – it requires that the full index be read. That’s a lot of expensive, slow I/O for big tables/indexes. LIMITED mode returns less information, but is a safer option for production systems.

The query returned data on two indexes on the Person table – its clustered index and a nonclustered index. The clustered index (blue in the diagram below) is 3 levels deep and 3811 pages wide at the leaf level (level = 0). The nonclustered index (green) is both shallower (2 levels) and narrower (105 pages at the leaf level):

An Index Seek starts at the topmost root page then traverses any intermediate layers to get to the leaf level pages where the column data you’re after resides. The cost of each seek is the depth of the index. [Note that deeper indexes (larger tables and/or wider index keys) will have a higher seek costs.] Once we get to the leaf level, we might scan additional pages laterally to return a range of data (e.g., all the persons whose last name is Martinez).
An Index Scan just reads through all the leaf level pages searching for data that matches your filter criteria. The cost is the number of pages at the leaf level.
To execute the this query using our nonclustered (non-covering) index…
SELECT Title, FirstName, LastName FROM Person.Person WHERE LastName = N'Martinez';
…the Optimizer first performs a seek + range scan on the nonclustered index to gather the first and last names plus the clustered index keys for all the folks named Martinez. Then, one at a time, it performs seeks into the clustered index (here referred to as key lookups) to retrieve their titles. The kicker is that each individual key lookup costs 3 logical reads, so to return 173 rows the cost is in the ballpark of 173 * 3 = 519 logical I/Os. And as the row counts increase the I/O costs increase 3X faster. As we approach 1300 rows we get to a point where it would be cheaper to simply scan the clustered index once (at a cost of ~3800 logical reads) and be done with it.
And this is why the Optimizer stops using your non-covering index – it’s simply too costly to use it. The point where this transition happens is called the tipping point.
You can’t predict where exactly this switch will happen. There’s lots of secret, internal magic around determining tipping points, but per Kimberly Tripp a ballpark figure is when you’re reading around 30% of the pages in the table.
If you’re feeling adventurous you can go hunting for tipping points using an approach like this:
SET STATISTICS IO ON;
-- Query an ever widening range of indexed values
SELECT Title, FirstName, LastName FROM Person.Person WHERE LastName LIKE N'D%';
/* 556 rows; 1717 logical reads */
SELECT Title, FirstName, LastName FROM Person.Person WHERE LastName LIKE N'[DE]%';
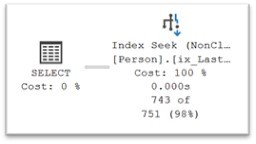
/* 743 rows; 2291 logical reads */
/* The tipping point is here. The queries above use key lookups, those below a clustered index scan */
SELECT Title, FirstName, LastName FROM Person.Person WHERE LastName LIKE N'[D-F]%';
/* 1111 rows; 3821 logical reads */
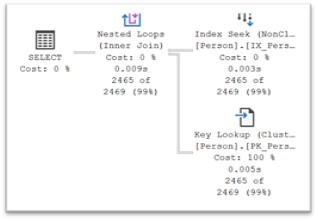
SELECT Title, FirstName, LastName FROM Person.Person WHERE LastName LIKE N'[D-G]%';
/* 2465 rows; 3821 logical reads */
Somewhere north of 743 rows the key lookup I/O cost becomes high enough that the Optimizer switches to using a clustered index scan.
The tipping point determination isn’t always spot on, but it will be close enough most of the time, so generally speaking, you shouldn’t be overriding the Optimizer’s judgement, although you can.
So what if you really want the Optimizer to use your lovely index? You can literally “force” the issue with a Table Hint, but it’s probably not a good idea as it’s likely to increase your I/O costs – and more I/O means slower queries. Let’s use the FORCESEEK hint on the last couple of queries where the Optimizer chose to use a clustered index scan:
SELECT Title, FirstName, LastName FROM Person.Person WITH (FORCESEEK) WHERE LastName LIKE N'[D-F]%';
/* 1111 rows; 3420 logical reads */
SELECT Title, FirstName, LastName FROM Person.Person WITH (FORCESEEK) WHERE LastName LIKE N'[D-G]%';
/* 2465 rows; 7575 logical reads */
In the first instance, the I/O costs are actually a bit lower, but, most of the time this won’t be the case. Note that the I/O cost for the 2465 row query is nearly double that when the Optimizer was allowed to do its thing.
A better solution here is to create a covering index which will eliminate both key lookups and clustered index seeks! Since indexes are costly to create and maintain, focus on creating indexes to support your most important queries well. Let’s create an index that covers that last set of test queries then rerun them:
CREATE INDEX ix_LastName_FirstName__Title
ON Person.Person (LastName, FirstName) INCLUDE (Title);

SELECT Title, FirstName, LastName FROM Person.Person WHERE LastName LIKE N'D%';
/*  556 rows; 6 logical reads */

SELECT Title, FirstName, LastName FROM Person.Person WHERE LastName LIKE N'[DE]%';
/*  743 rows; 7 logical reads */

SELECT Title, FirstName, LastName FROM Person.Person WHERE LastName LIKE N'[D-F]%';
/* 1111 rows; 9 logical reads */

SELECT Title, FirstName, LastName FROM Person.Person WHERE LastName LIKE N'[D-G]%';
/* 2465 rows; 16 logical reads */
Now all 4 can be executed with index seeks and the I/O cost plummets greatly improving performance!
Happy Exploring!
I’d like to grow my readership. If you enjoyed this blog post, please share it with your friends!


